
Accessing Custom Reports
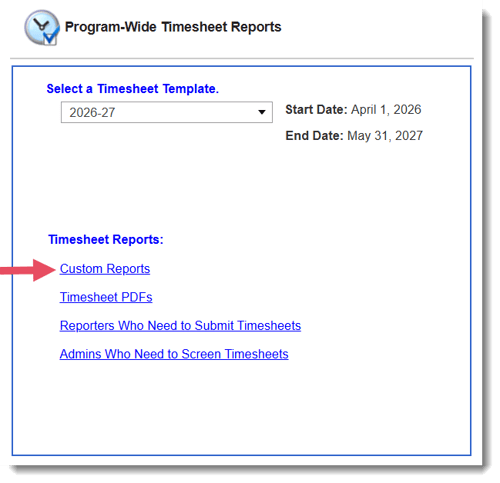
- In Mission Control, click Timesheets.
- Select Site Data or Program-Wide Data, depending on the scope of the export.
- Select the Timesheet Template you want to export data from.
- Under Timesheet Reports, click Custom Reports.
Choosing The Daily Report Format
- In Report Type, select Daily Report.
- Click Select Timesheet Data.
- Under Set How Data Is Organized, select Organize By Date.
This setting organizes the export by day instead of another grouping method.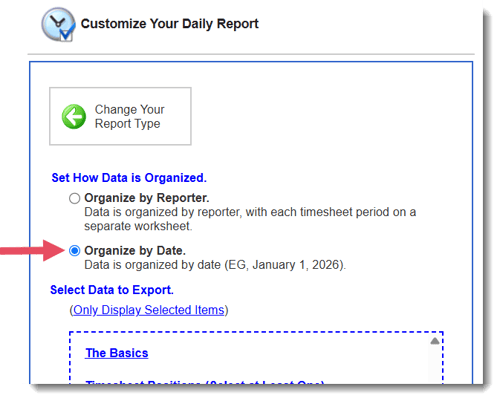

CAUTION: Confirm that Daily Report is selected before exporting. A different report type will change the export format and may not create one row per day.
Selecting Timesheet Data Fields
- Under Selections or Select Data To Export, choose the timesheet fields you want to include.
Common baseline fields include:
-
-
- Submitted Hours
- Approved Hours
- Pending Hours
- Time In
- Time Out
-
Optional fields include:
-
-
- Time allocation by category
- Time allocation by subcategory
- Time allocated to each site
- Time Off Reason
- Written descriptions for categories, subcategories, or unallocated time
-
- Select only the fields needed for the report.
TIP: Start with the default settings, then add only the fields you need. Too many fields can make the Excel file harder to review.
Configuring Site Name & Row Breakout Settings
- Choose whether to include site names in the export.
- Select the row structure that matches your reporting needs:
| Option | Result |
|---|---|
| No site names | Site information is excluded. |
| Include site names without breakouts | The export creates one row per day for each reporter, even if the reporter served at multiple sites. |
| Include site names with breakouts | The export creates separate rows for each site served by the reporter on the same day. |
Use site breakouts only when you need site-level detail for each day.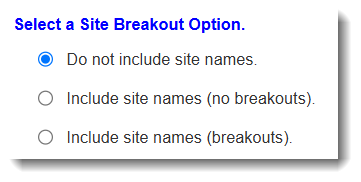 CAUTION: If you choose site breakouts, one reporter may have multiple rows for the same day when they served at multiple sites.
Selecting Reporters
- Choose whether to include all relevant reporters or only specific reporters.
- Keep the default setting if you want to include all relevant reporters.
- Select individual reporters if you only need data for specific people.
TIP: Select specific reporters when you are troubleshooting, validating data, or creating a smaller test export.
Adding Profile Data
- Choose whether to include reporter profile data in the export.
- Keep the default setting if you do not need profile data.
- If you enable profile data, select fields from the available Standard Panels or Custom Panels.
- Add only the profile fields needed for the report.
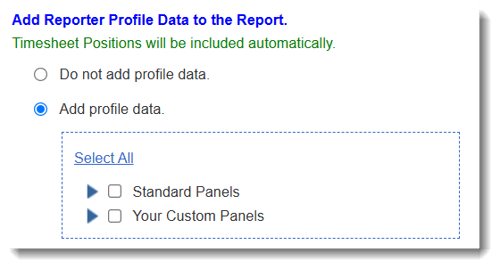
CAUTION: Adding too many profile fields can make the export harder to read and maintain.
Setting The Export Date Range
- Choose the time period for the export.
- Select one of the following options:
a. A specific date range using exact start date and end date values
b. A starting Timesheet Period and ending Timesheet Period - Confirm the date range matches the reporting period you need.
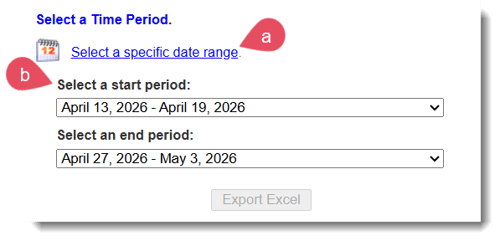
CAUTION: Check the start date and end date carefully. An incorrect date range can create missing or extra data in the export.
Exporting The Report To Excel
- Review your report selections.
- Click Export Excel.
- Wait for the download window to open and the file to generate.
- Save the Excel file to the appropriate location.
CAUTION: Confirm that the Excel file generated successfully before using or sharing it. If the download window produces an error, repeat the export or adjust your browser download settings.
Understanding the Export Structure
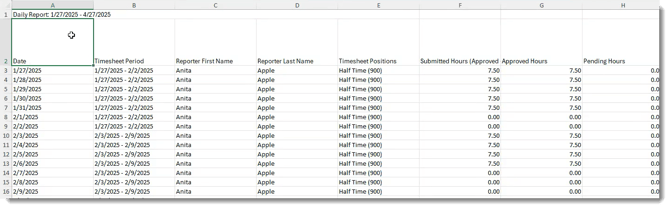
A daily-by-date timesheet export presents timesheet activity in a single, flat worksheet.
The first two rows provide important context:
- Row 1 shows the date range selected for the export.
- Row 2 contains the column headers.
Confirm the date range in Row 1 before reviewing or analyzing the data.
How Records Are Organized
Each row represents one reporter’s timesheet data for a specific date.
Records are organized in the following order:
- Reporters are grouped by last name.
- Reporter groups appear in alphabetical order.
- Dates within each reporter’s group appear in chronological order.
This structure makes it easier to review one reporter’s activity across multiple dates.
NOTE: Reporter records may not appear in the order they were submitted.
Core Identity and Timesheet Period Fields
The first columns identify the reporter and the timesheet period connected to each row.
Common fields include:
- Date: The date represented by the row.
- Timesheet Period: The timesheet period that includes the date.
- First Name: The reporter’s first name.
- Last Name: The reporter’s last name.
- Timesheet Position: The reporter’s assigned Timesheet Position.
Additional profile fields may appear if they were selected when the export was created.
Use these fields to confirm that you are reviewing the correct reporter, date, and timesheet period before analyzing hours.
Submitted, Approved, and Pending Hours
The export may include separate columns for submitted, approved, and pending time.
Submitted Hours is the total of:
- Approved Hours
- Pending Hours
Use the separate approved and pending columns to determine how much submitted time has completed review and how much is still awaiting approval.
Time In, Time Out, and Total Hours
If the Timesheet Template uses Time In and Time Out, the export may include:
- Time In
- Time Out
- Total Hours
Use the Time In and Time Out fields to review the reporter’s recorded start and end times.
Use Total Hours to review the total time recorded for the date.
The export may also include:
- Goal Hours
- Non-Goal Hours
- Weekly allocation totals
These fields can help you compare recorded time with program expectations.
Time Allocation Categories and Subcategories
Time Allocation Category and Subcategory columns show how the reporter classified their time.
Category and subcategory names depend on the Timesheet Template configuration.
Some categories or subcategories may also include written-description fields. These fields provide additional details about the reported activity.
NOTE: A blank written-description field usually means the reporter did not enter a description.
Unallocated Time
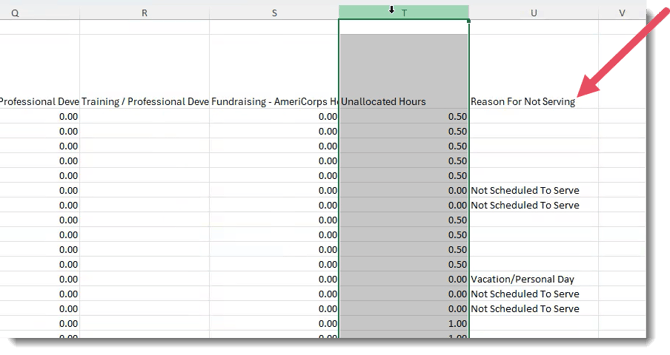
Unallocated Time is time recorded between Time In and Time Out that was not assigned to a Time Allocation Category or Subcategory.
The export may also include a written description for unallocated time.
Use these fields to identify entries that may be incomplete or require follow-up.
CAUTION: Do not assume that a blank unallocated-time description indicates an export error. It usually means no description was entered.
Reasons for Not Serving and PTO
The export may include optional fields related to absences or non-serving days.
Reasons for Not Serving
If Reasons for Not Serving are included, the export displays the reason selected on the timesheet.
Review the reason as written to preserve the original entry.
PTO
If PTO is enabled, the export may include a separate PTO column.
Use these fields to understand absences, exceptions, or non-serving time that may affect reporting.
NOTE: These columns appear only when the related features are enabled and included in the export.
Site Assignment Data
Site Assignment data may appear in one of two formats.
Summarized by Date
When site data is summarized, each reporter’s daily record remains on one row.
Broken Out by Site
When site breakout is enabled, a reporter may have multiple rows for the same date.
Each row represents time connected to a different Site.
CAUTION: Multiple rows for the same reporter and date are not necessarily duplicate records. Review the Site Assignment field before removing or combining rows.
Optional Fields and Export Differences
Daily-by-date exports do not always contain the same columns.
Available fields depend on:
- Timesheet Template settings
- Export selections
- Time allocation configuration
- PTO settings
- Site Assignment settings
- Written-description settings
- Reasons for Not Serving
Review the column headers before comparing one export with another.
Tips for Reviewing the Export
Use spreadsheet tools to make the file easier to review:
- Apply filters to Row 2 to isolate a reporter, date, Site, or category.
- Freeze the top two rows so the date range and column headers remain visible.
- Filter by last name to review one reporter’s records.
- Save an unchanged copy before editing, sorting, or deleting data.
- Use a consistent Site Assignment export format when comparing files over time.